The Height Map Editor has been getting a lot of new tools lately, like Terrain Analysis Masks, the Normal/Light Map editor, and the newer terrain preview systems. Next to those, the old Gradient Ramp Editor was starting to feel out of place. It was useful, but it looked more like an older utility window than something I really wanted to show off.
So I decided it was time to rebuild it.
A Much Better Main Preview
The first big thing I wanted was a better way to actually see the colormap.
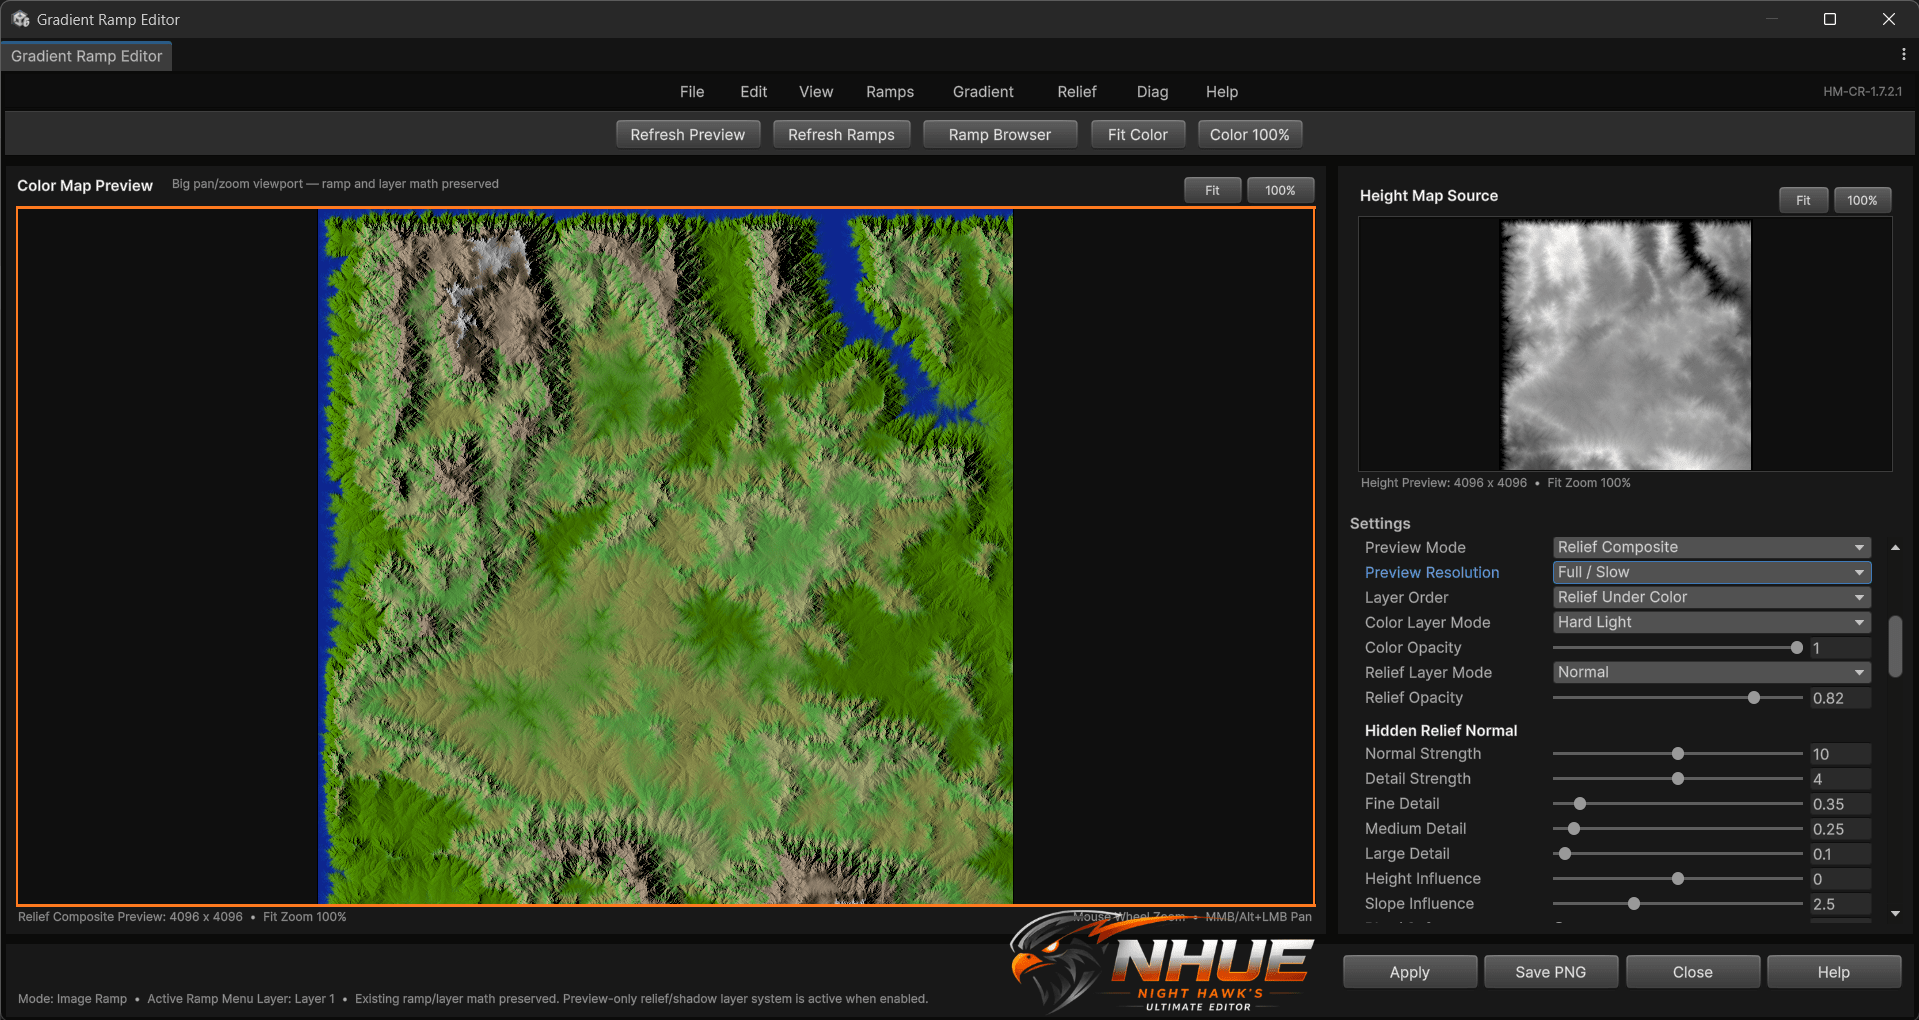
The old editor had previews, but they were not big enough for what I wanted anymore. When working with terrain color maps, I need to see the result clearly. I want to zoom in, pan around, and really inspect how the colors are landing on the height map.
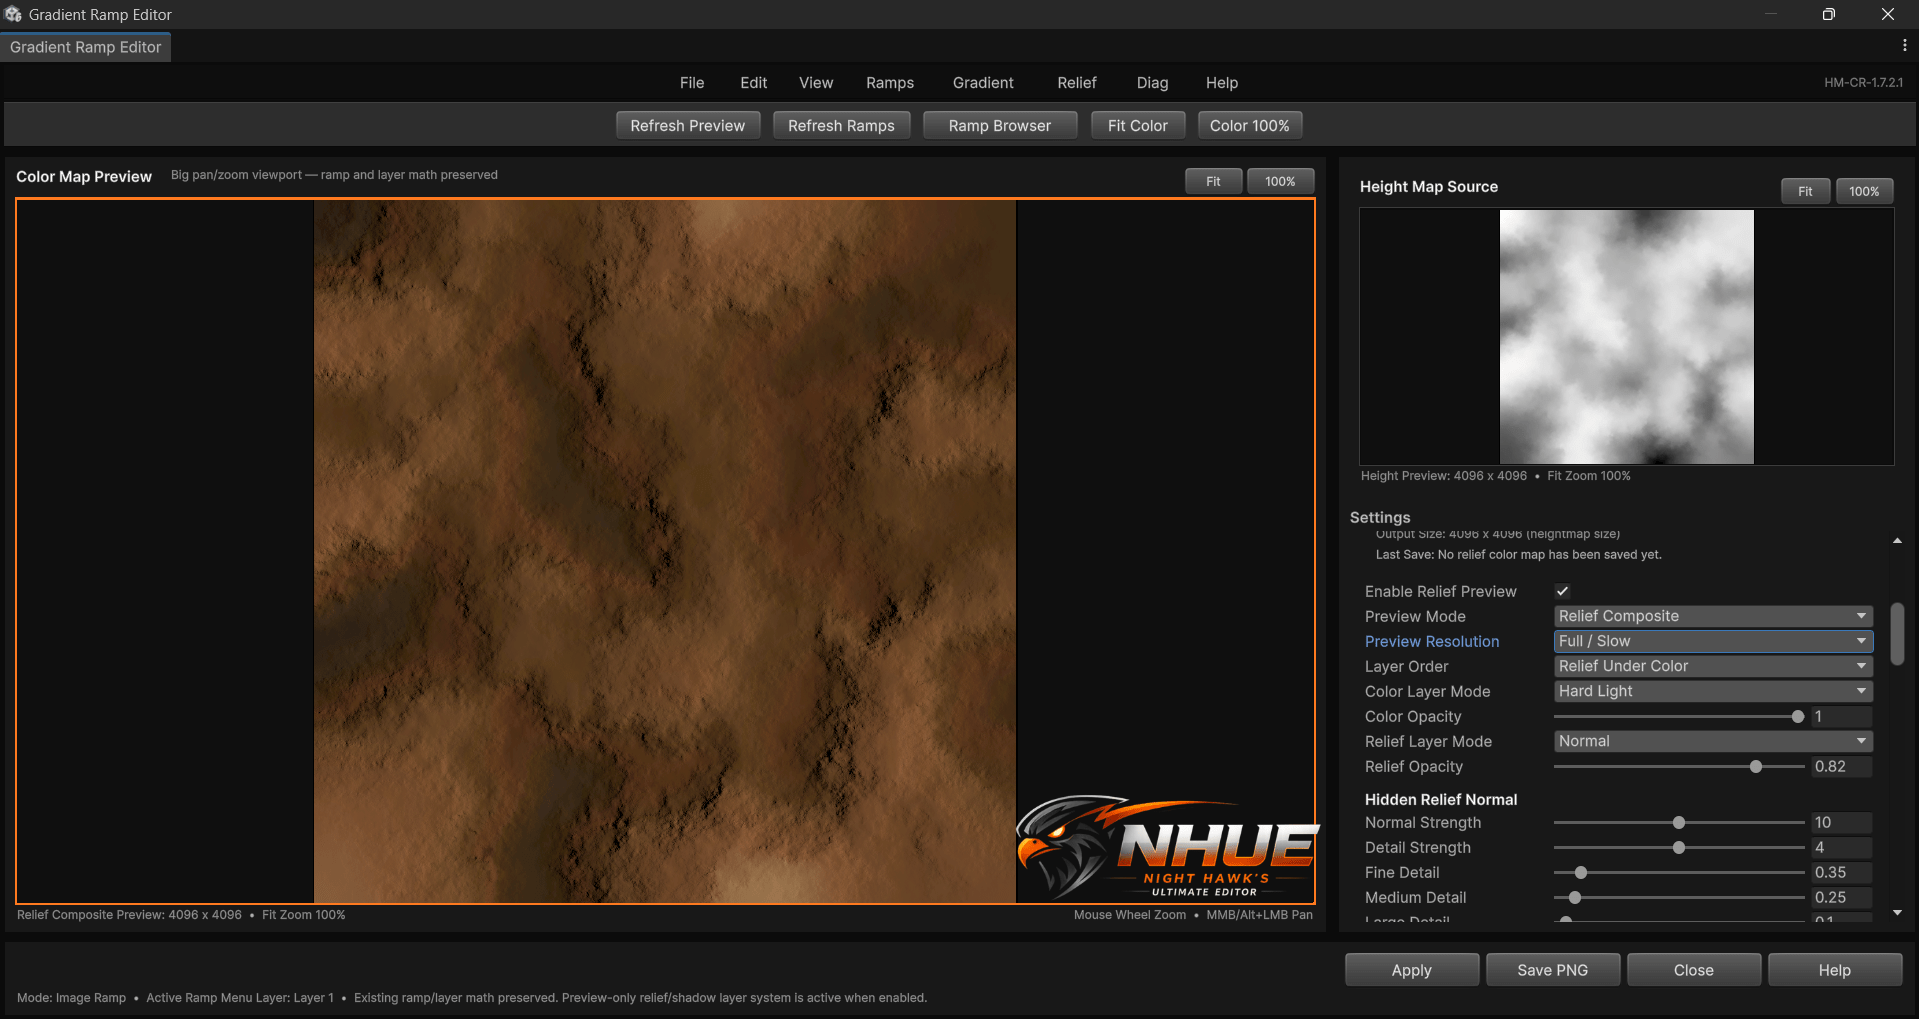
The new Gradient Ramp Editor now has a large main colormap preview. The height map source is still there, but the main focus is the final color map. That makes the whole window feel much more useful.
The right-side panel now holds the height map source preview, terrain layer settings, relief controls, and export options. This layout feels much more natural to me, especially compared to the old version where everything felt cramped together.
The Ramp Browser
Another part that needed a big upgrade was the ramp list.
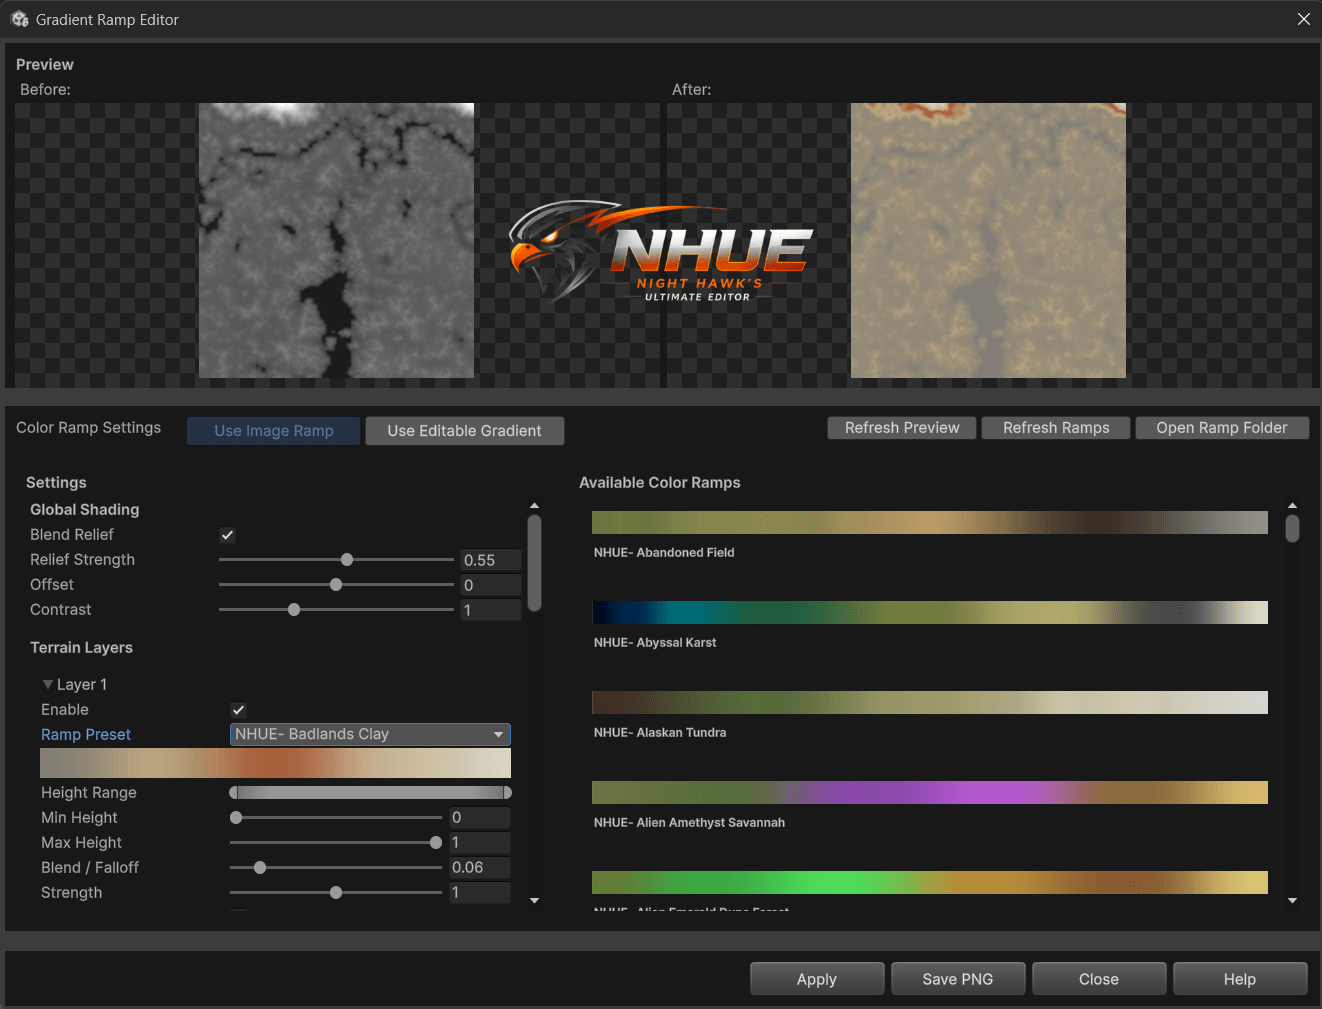
Before, the available color ramps were shown directly inside the editor window. It worked, but once the ramp library started growing, that was not good enough. I wanted something closer to a real browser.
So now GRE has a dedicated Ramp Browser.
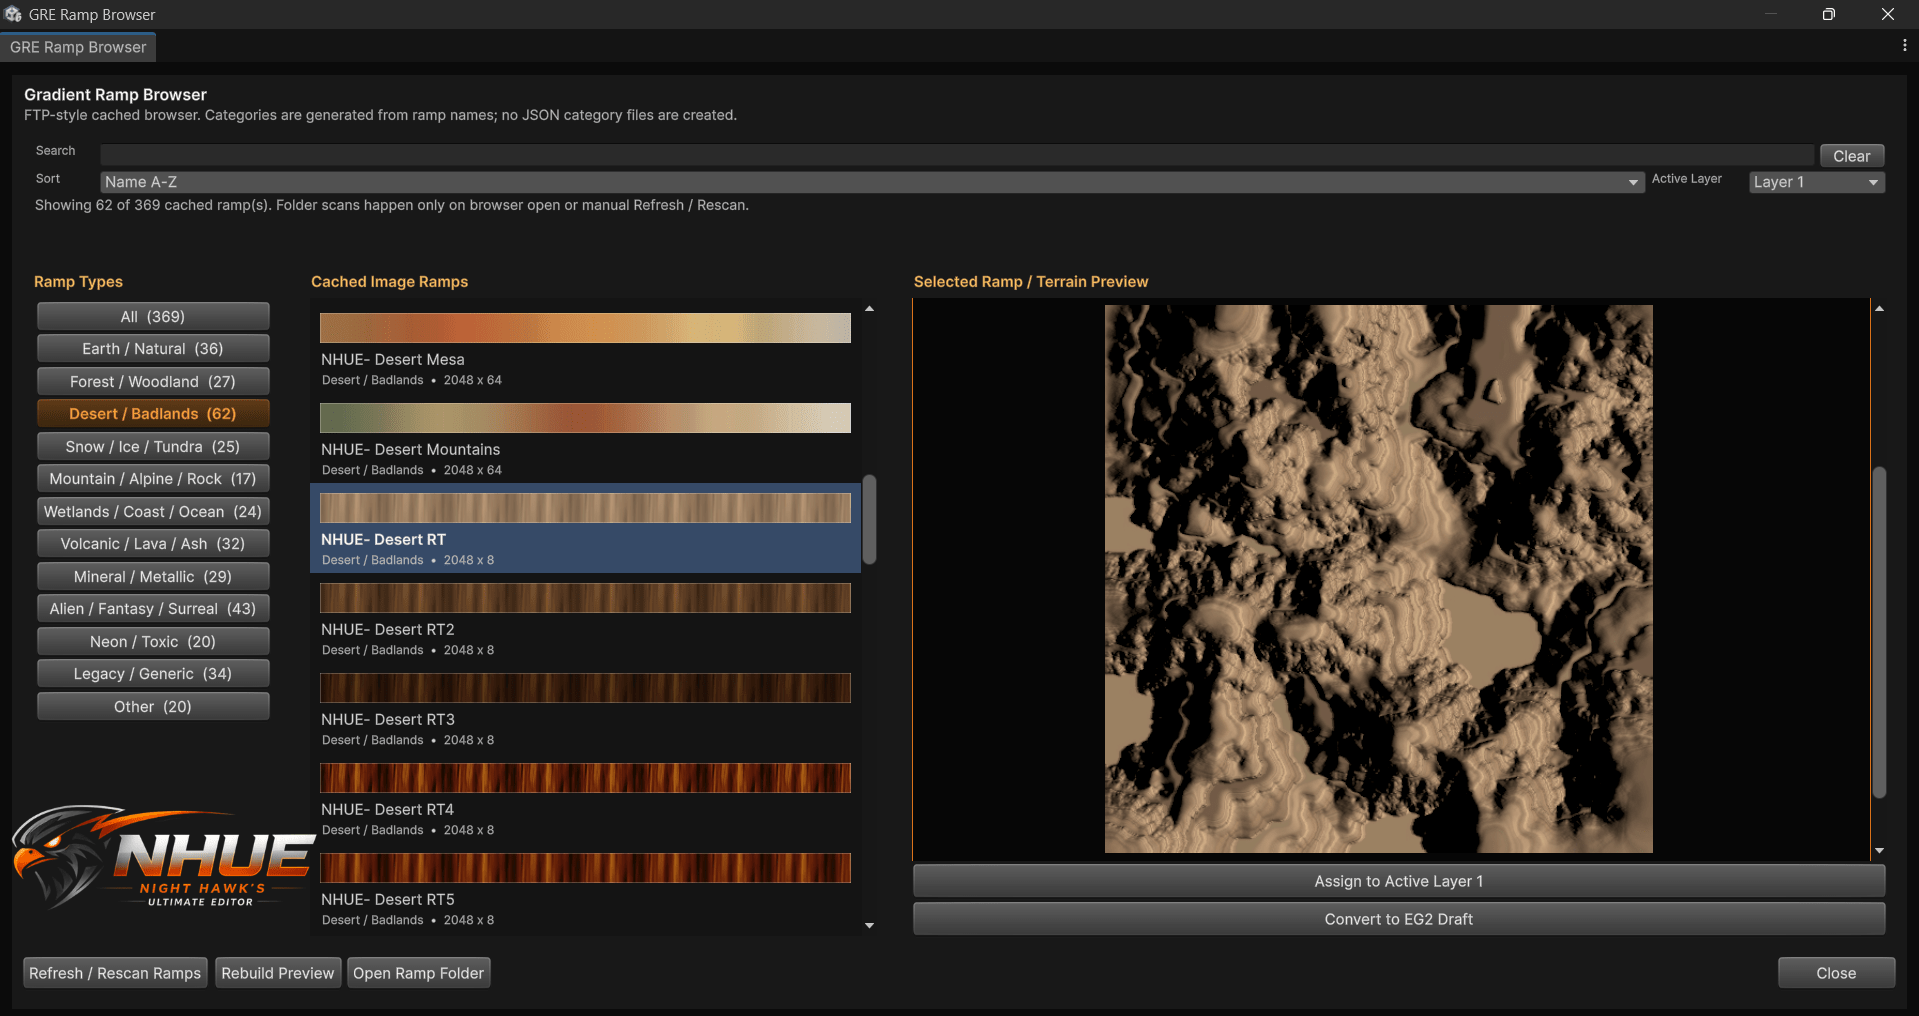
The Ramp Browser can categorize ramps, search through them, show larger swatches, and preview the selected ramp on the active height map. It also caches the ramp library, so it is not constantly checking the folder over and over again.
That was important because the ramp folder has a lot of ramps now. I wanted it to load fast, but still feel like a real library tool.
The browser also has color preview, relief preview, and side-by-side preview modes.
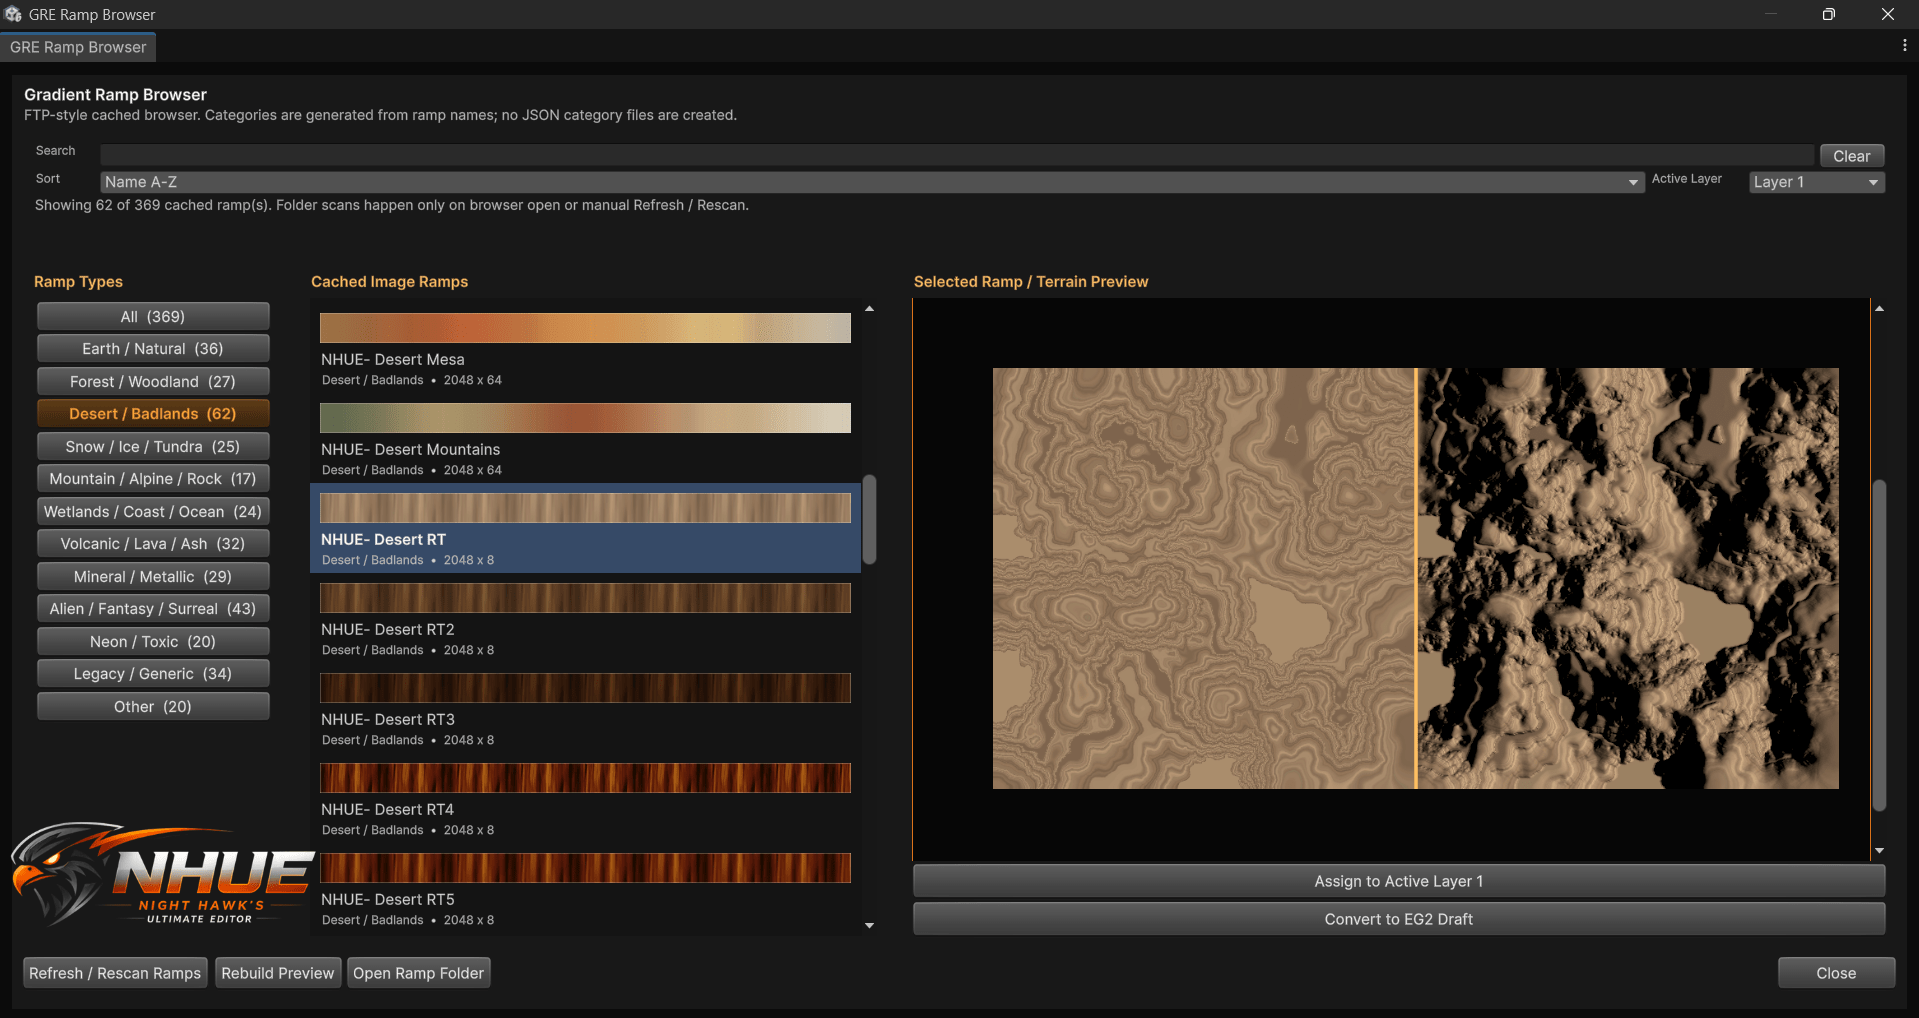
The cool part is that selecting a ramp in the browser does not instantly change the main editor. You can browse, preview, compare, and only assign it when you are ready.
Editable Gradient 2
The old editable gradient system also needed more room.
Instead of keeping it stuffed into the main GRE side panel, I moved it into its own workbench window called Editable Gradient 2.
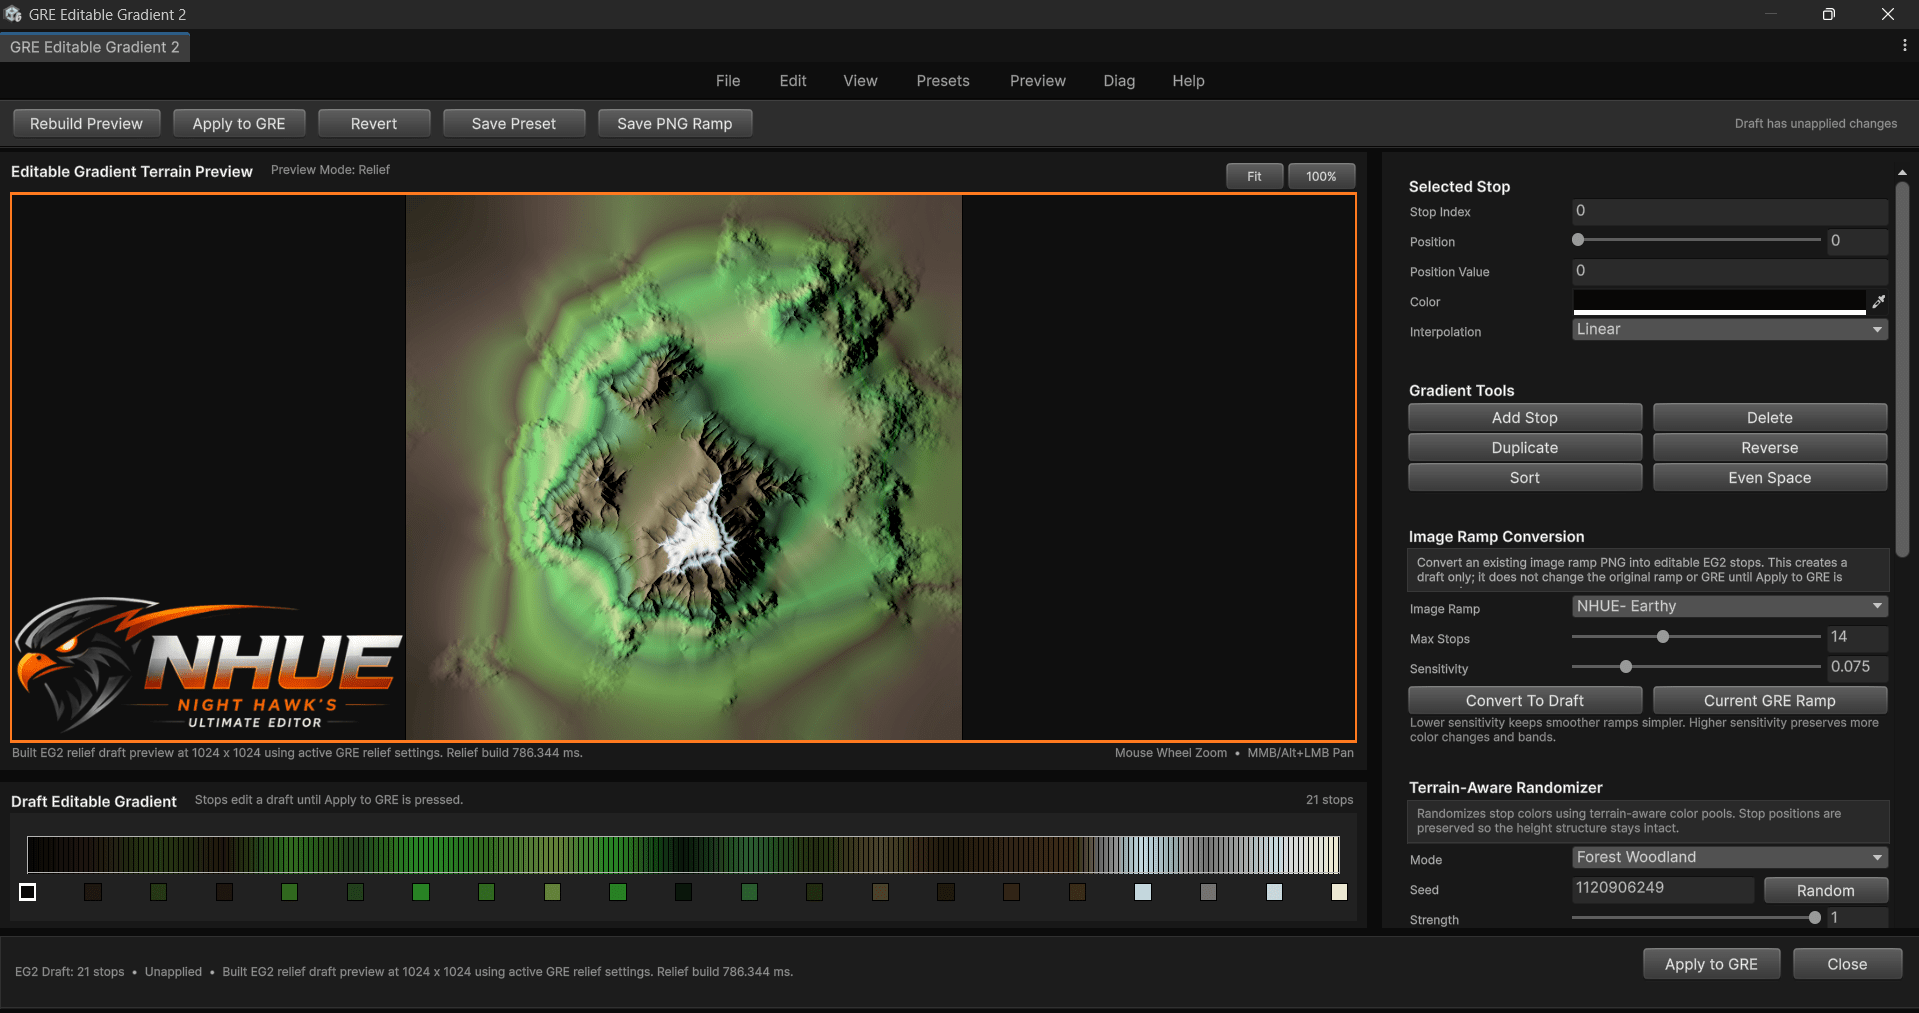
This window lets me work on a draft gradient without instantly changing the main Gradient Ramp Editor. I can load a preset, edit stops, randomize colors, convert an image ramp into editable stops, preview everything on the terrain, and then apply it back to GRE when I’m happy with it.
That draft workflow makes it way easier to experiment.
The Terrain-Aware Randomizer
One of my favorite parts of this whole update is the Terrain-Aware Randomizer.
This is not just random RGB colors thrown onto a gradient. The randomizer looks at where the gradient stop is in the height range and tries to pick colors that make sense for that area.
Lower areas can become water, wet soil, mud, grass, or darker terrain. Middle areas can become grass, forest, sand, clay, or dry terrain. Higher areas can become rock, snow, ash, mineral colors, or weird fantasy colors depending on the mode.
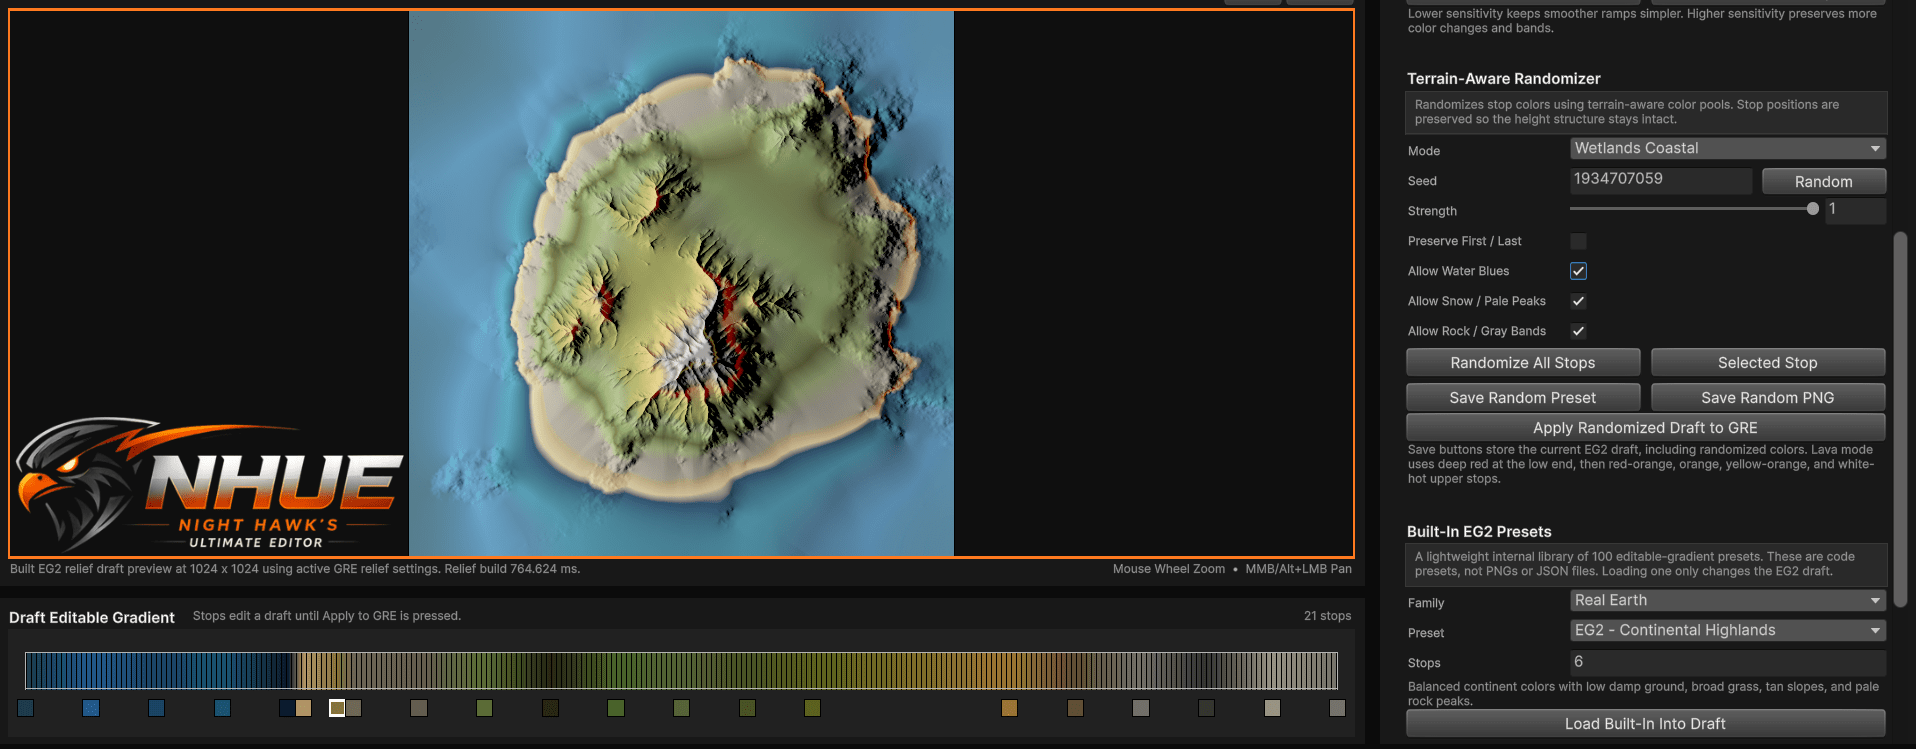
It has modes like Natural Terrain, Forest/Woodland, Desert/Canyon, Alpine/Snow, Wetlands/Coastal, Volcanic/Lava, Alien/Fantasy, and Chaos.
This turned out better than I expected. It is fun to use, but it is also actually useful. You can get a good starting point very quickly, then tweak it by hand after.
Converting Image Ramps Into Editable Gradients
Another thing I really wanted was a bridge between the old ramp library and the new editable gradient system.
Now I can take an existing image ramp and convert it into editable gradient stops.
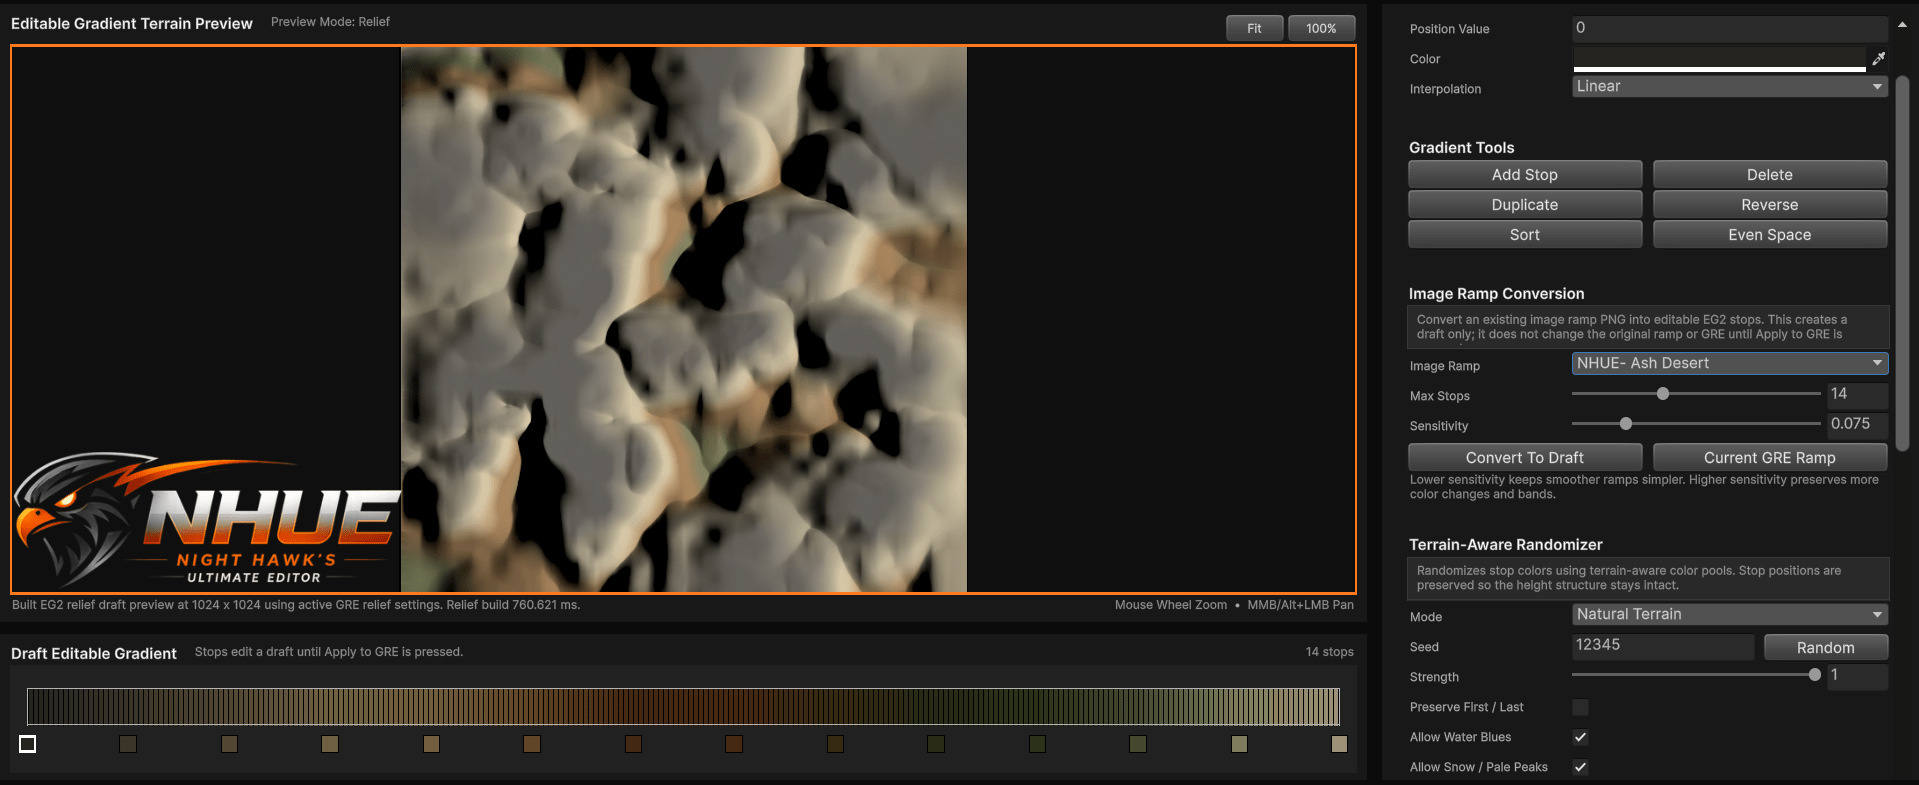
That means older ramps are still useful, but now they can become editable starting points. I can load one, convert it, tweak the stops, randomize parts of it, save it as a preset, or export it back out as a PNG ramp.
That gives the whole system a lot more flexibility.
Built-In EG2 Presets
Editable Gradient 2 also has a built-in preset library now.
There are 100 internal presets covering all kinds of terrain styles. Real-world terrain, forests, deserts, badlands, alpine, tundra, wetlands, islands, grasslands, mountains, volcanic areas, ash and basalt, minerals, moons, Mars-like worlds, alien terrain, toxic worlds, fantasy, horror, and some weird/funny stuff too.
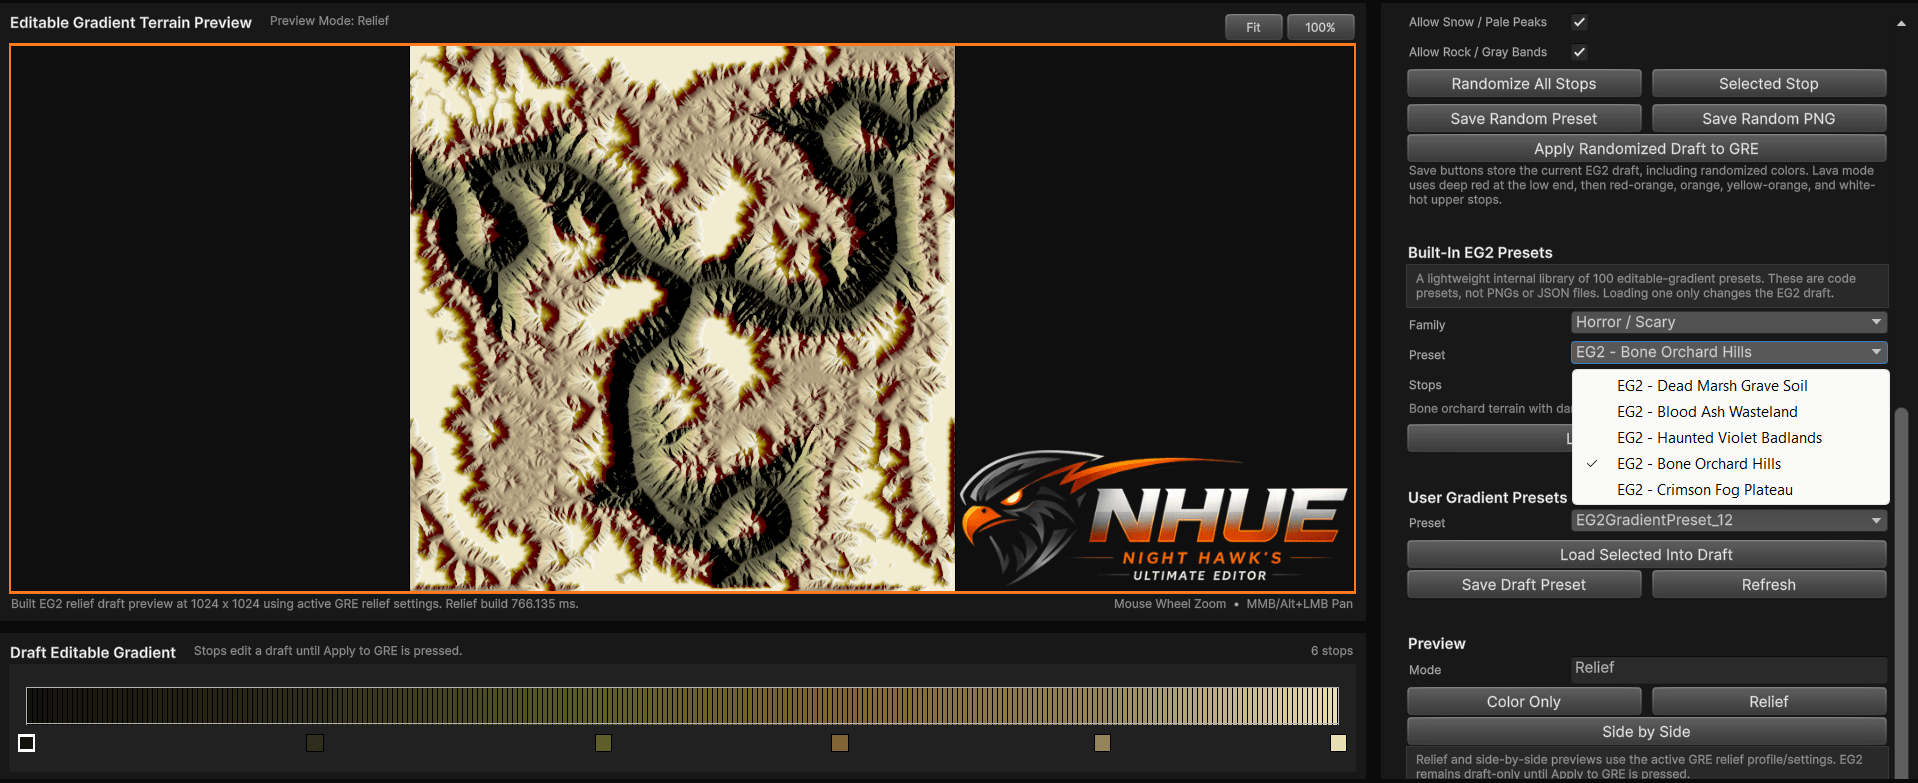
These are not extra PNG files and they are not a huge pile of JSON files. They are lightweight built-in presets that load into the draft gradient.
There is even a special one called:
I had to make one that was just completely different.
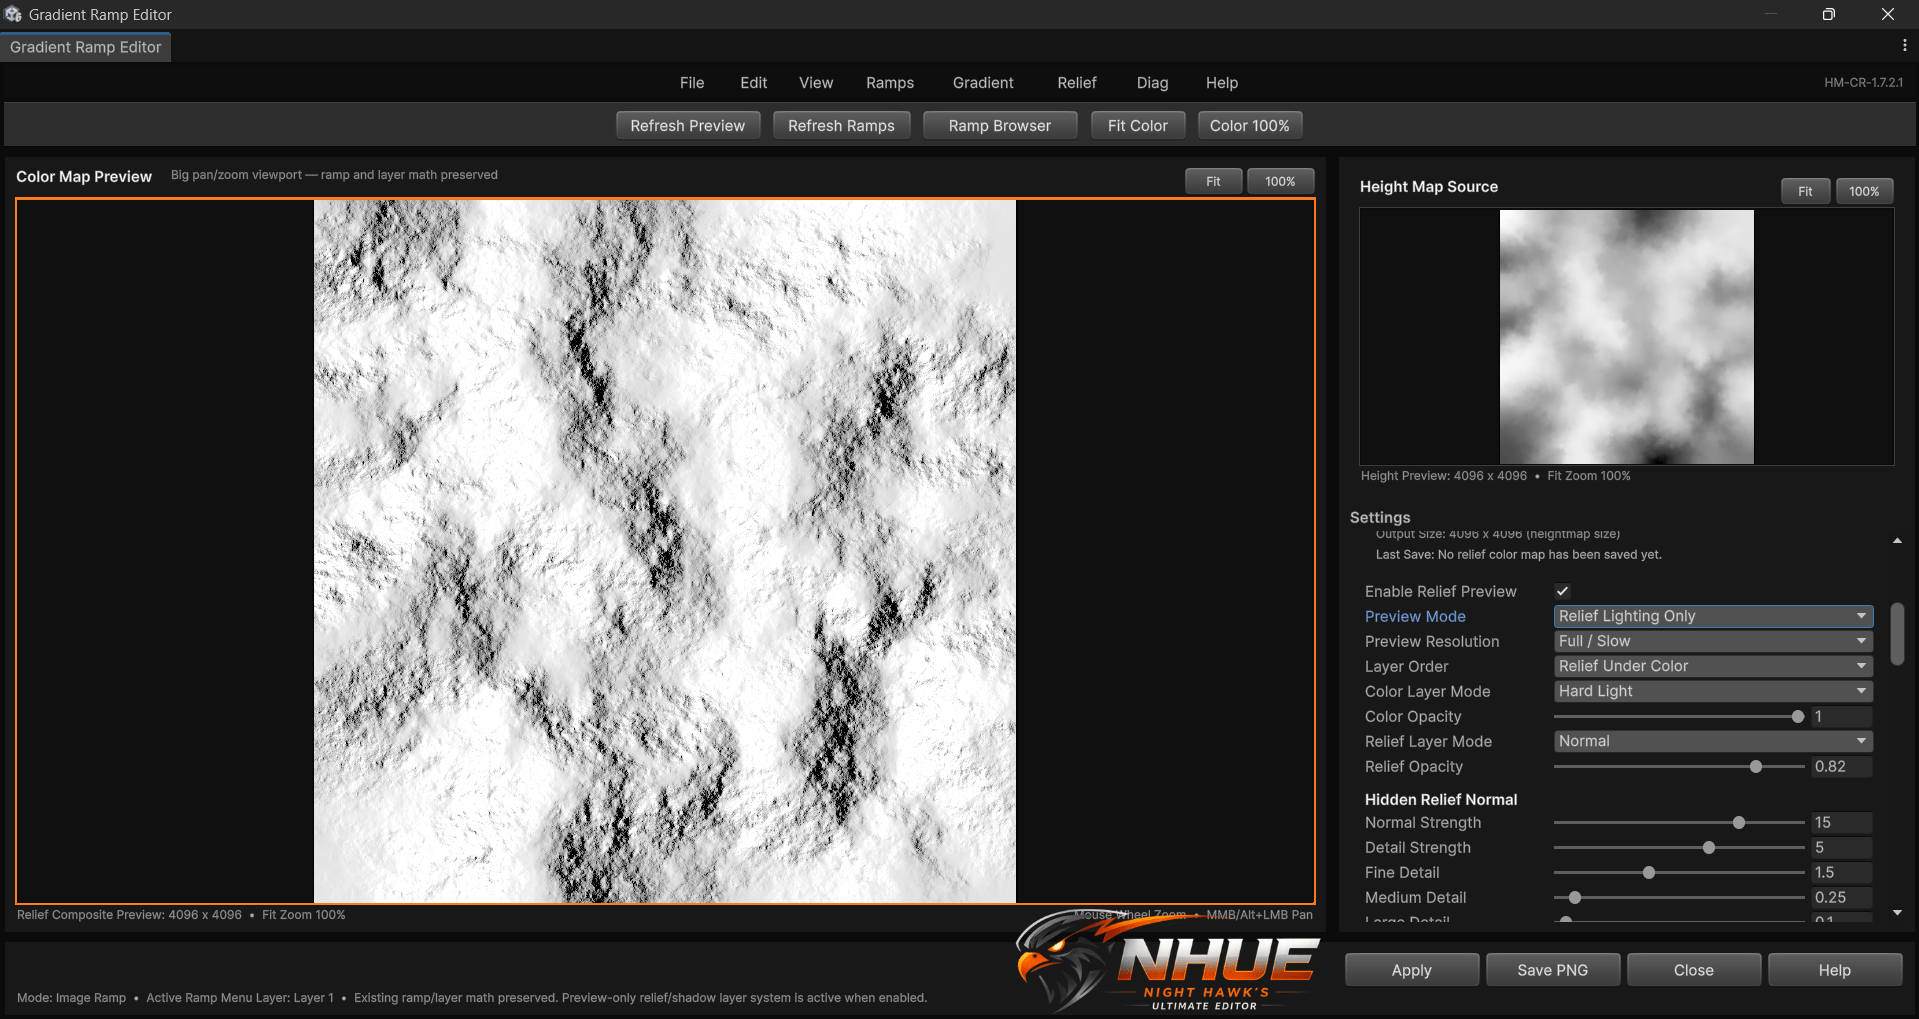
The Relief / Shadow System
This is the part I was really waiting for.
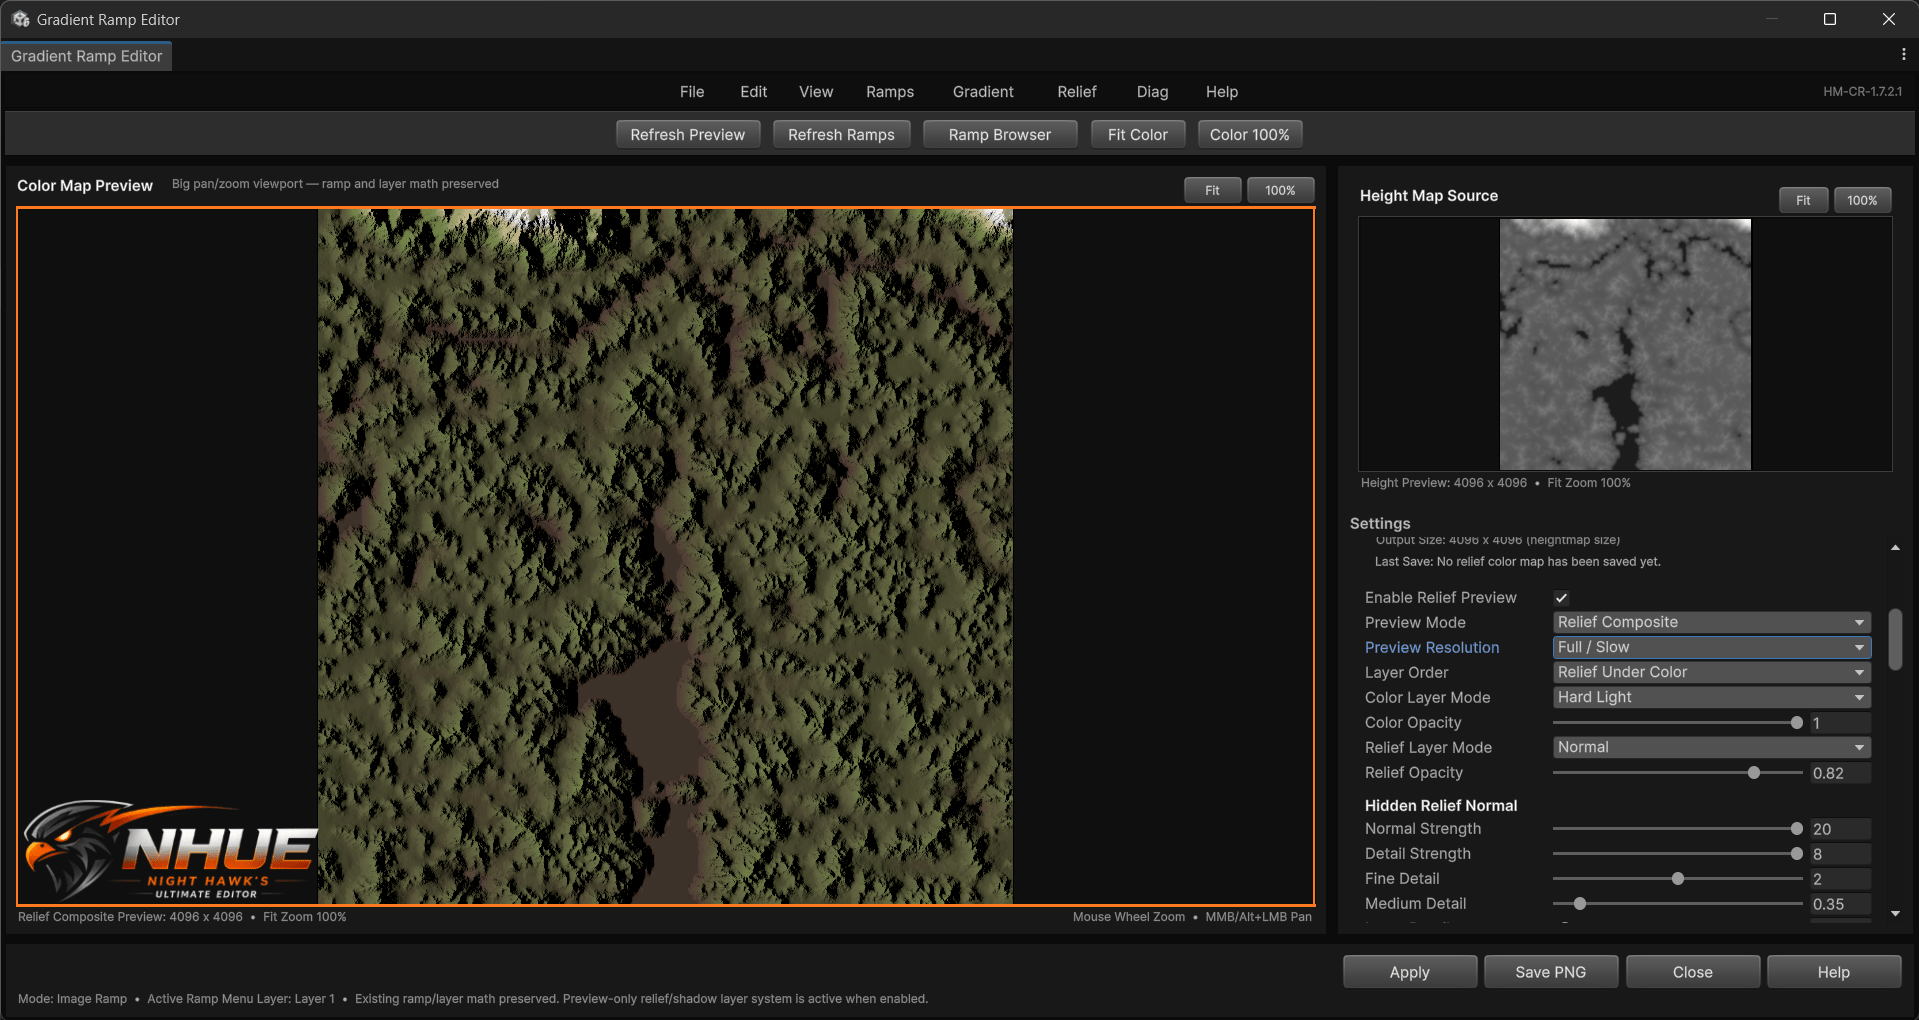
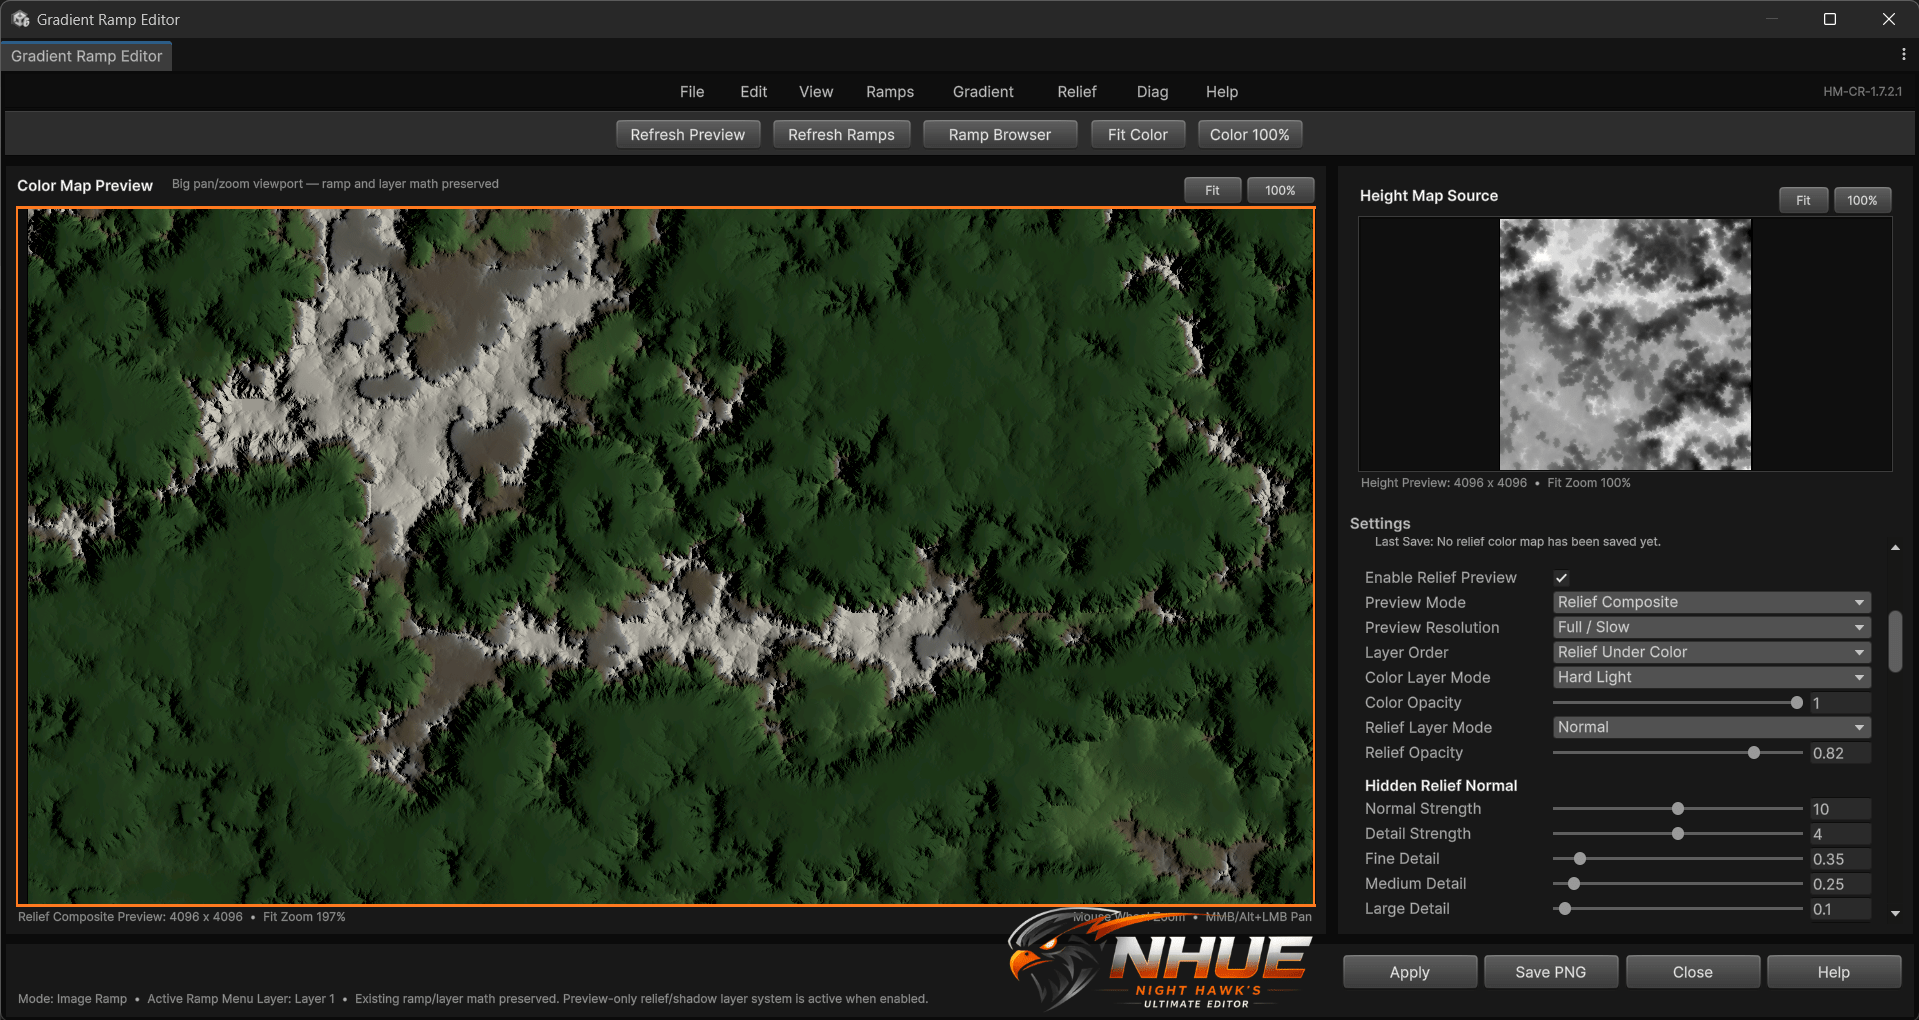
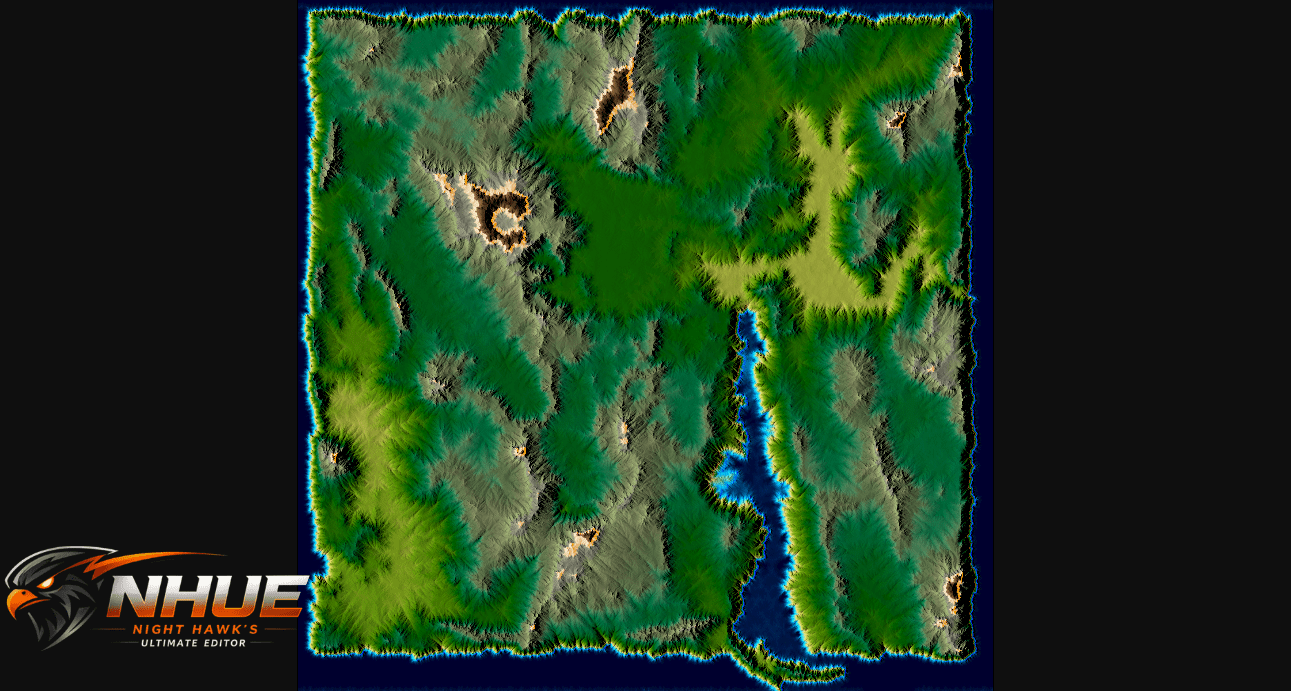
The new Gradient Ramp Editor can now add relief and shadowing to the color map preview. It uses the height map to create a hidden relief/lighting pass, then blends that with the colormap.
The result gives the terrain much more definition.
I wanted something that could get close to the kind of shaded colormap look I liked in older terrain tools, especially GeoControl 2. I did not want to copy it exactly, but I wanted that same idea where the colormap has terrain shape and shadowing baked into the look.
After tuning the settings, I think NHUE got there.
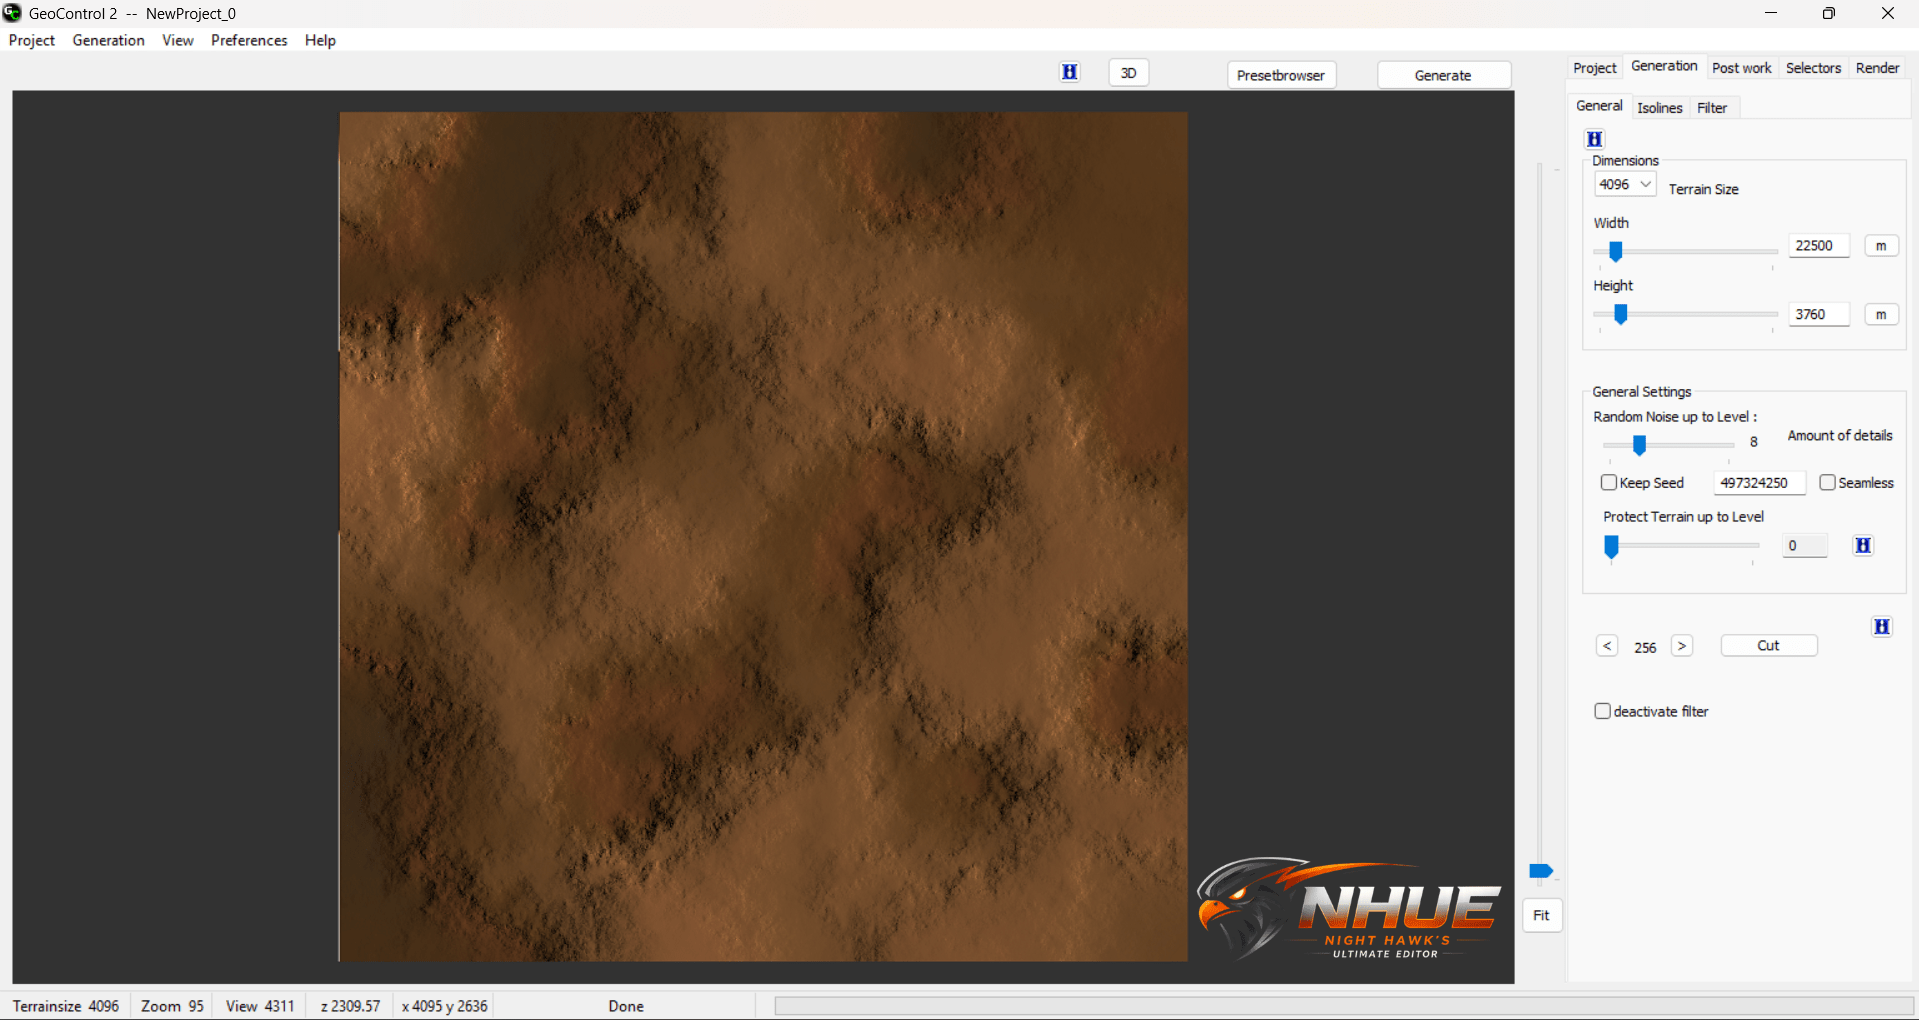
Honestly, I think I like the NHUE result better now. It has its own look and it feels stronger to me.
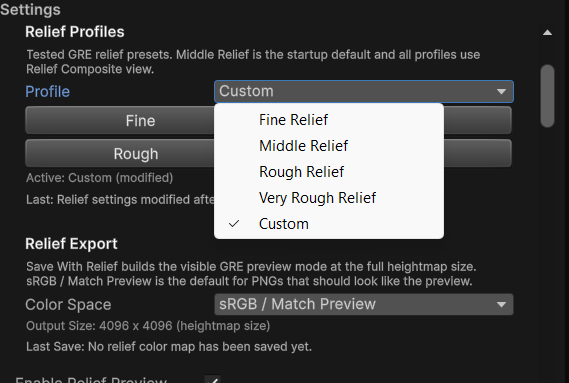
Relief Profiles
To make the relief system easier to use, I added four tested profiles:
- Fine Relief
- Middle Relief
- Rough Relief
- Very Rough Relief
Middle Relief is the default when GRE opens, because it gives a good starting point right away.
Fine is more subtle. Middle is a good general-purpose setting. Rough and Very Rough push the terrain detail harder.
There is also a Relief Lighting Only view, which helps when tuning the shadows.
Saving Color Maps With Relief
The editor now separates normal colormap saving from relief colormap saving.
A normal save gives you the pure colormap.
A relief save gives you the shaded version.
There is also a color space option for saving:
- sRGB / Match Preview
- Linear
The default is sRGB / Match Preview because I want the saved image to look as close as possible to what I see in the editor preview.
That was important to me. If I spend time tuning the preview, I want the exported image to match it.
Diagnostics Helped A Lot
A lot of this upgrade was built with diagnostics running behind it.
The diagnostics helped catch things like the first preview not refreshing on window open, relief preview builds being too slow, full reports getting way too huge, and save timing needing better breakdowns.
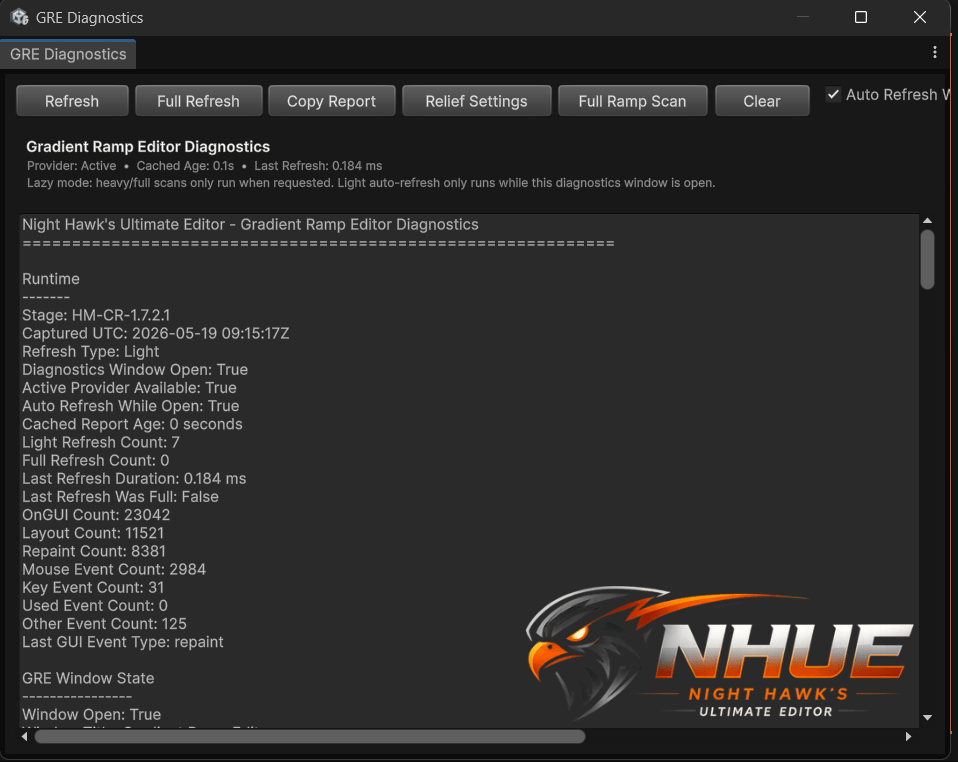
The relief preview also got a nice speed pass. At first it was way too slow when working with 4096 maps. Now the editor uses smaller preview builds while working, then full resolution when saving.
That made the whole system feel much better.
Final Thoughts
This upgrade turned the Gradient Ramp Editor into something way more useful than it was before.
It is no longer just a simple ramp preview window. Now it has a real browser, editable gradients, randomization, ramp conversion, built-in presets, relief profiles, side-by-side previews, and shaded colormap export.
It finally feels like it belongs with the rest of the Height Map Editor tools.
I am really happy with how this turned out.
The Gradient Ramp Editor is now something I actually want to show off.